Connect Manager allows you to create two types of user:
- Chain level user
- Merchant level user
A chain level user exists at a ‘head office’ level, and has access to data and features for all merchant IDs within the chain. Any user that needs to set or edit policies such as expiry or limits must be set up as a chain level user. A chain level user can run reports related to any or all merchant IDs within the chain.
A merchant level user is typically up with access to only one single merchant ID, or optionally with access to a group of merchant IDs. This kind of user can be set up to load and redeem cards but cannot make any policy changes. They may be given access to some reports, but will only be able to report on activity at the merchant ID(s) with which they are associated.
Please note: Insight Reporting is only accessible to Chain Users.
If you have an employee wishing to view more in-depth reports and they are currently set up as a merchant user, they need to be set up as a new as a chain user with access to ‘insight report list’ via the reporting menu option.
Granting and creating a chain user gives them access to viewing & reporting for all Merchant ID’s within your programme.
Alternatively the Super User within your programme can run these reports and provide to staff members.
Option 1 - Chain Level User Setup
Steps
1. Go to Users in the top right of the navigation menu – a drop down menu will present a “list users” box – the following details of all users set up will appear
2. To create a new User click the Green “Add New User” link at the bottom of the users grid – the Add User screen will be displayed
3. Choose the “Chain” radio button
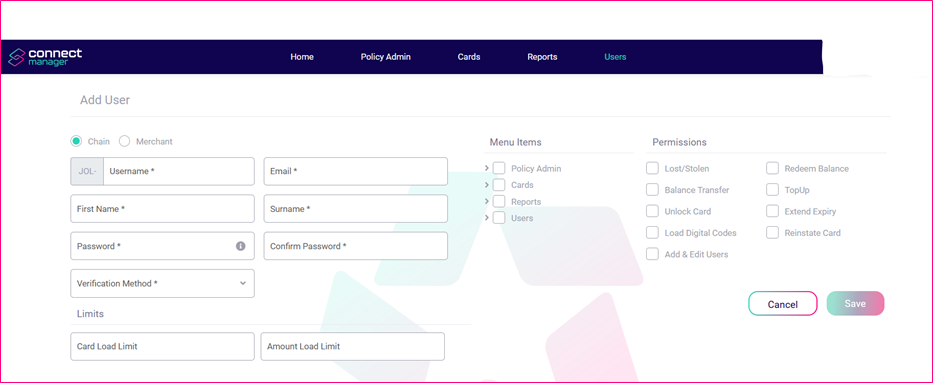
4. Enter details for Username, Email, First name & Surname.
Note that customer shortcode is part of the username (displayed to left of username textbox) – so if for e.g. if the customer shortocde is “PRT-” and JohnSmith is entered as the username, the username John Smith will use to log into Connect Manager is “prt-johnsmith” (the username is not case sensitive).
5. When entering Password please note the Password Rule *Must be 6 to 20 characters and contain 1 digit & 1 Uppercase Letter
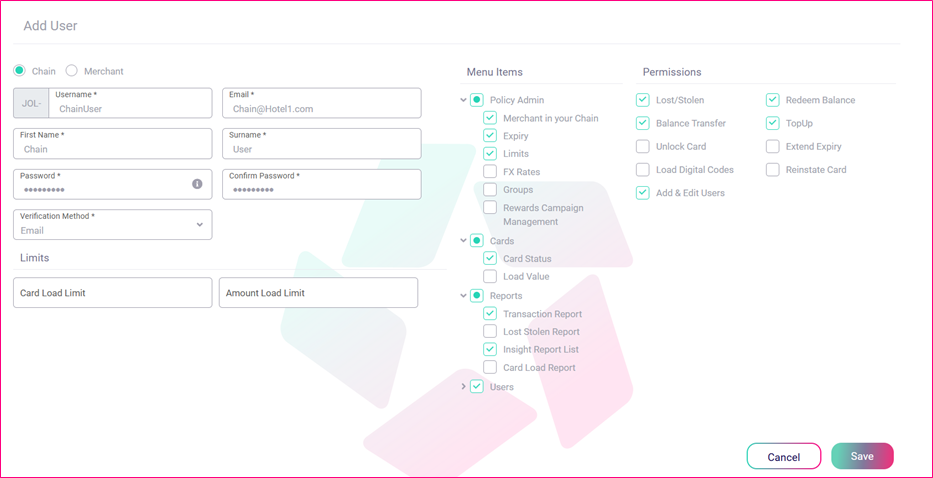
6. Next select Menu Items to the right – there is a drop down menu for each option
7. Assign Menu Items you deem sufficient to the chain user you are setting up, you will only ever be able to add menu items you yourself as a User already have
8. Next assign Permissions – Permissions are extra add ons to Menu Items
9. Click “Save” in the colored box – the list of users will be updated with new user
Option 2 - Merchant Level User Setup
Steps
1. See steps for Chain User but choose “Merchant” radial button
2. Enter all relevant details for Username, Email etc
3. The difference in screens between Chain & Merchant Users is that you have to assign a Merchant User to a MID – This allows the merchant user as stated previously to only view details (ie Balances or Transactions) on the 1 mid.
4. Assign Menu Items & permissions to the Merchant User – reminder you only want to give them access to items they are allowed to view/use.
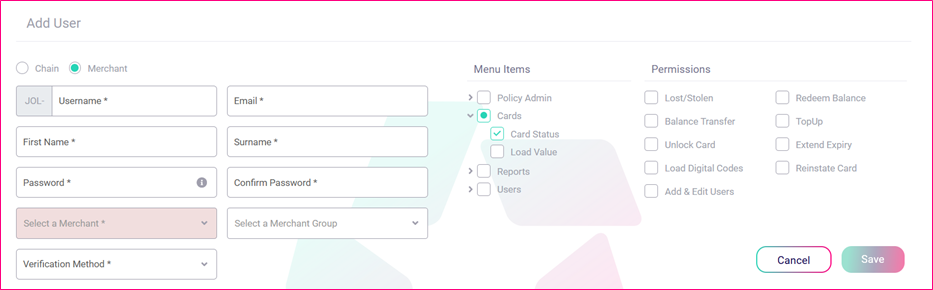
See below where a Merchant User has been granted access to Cards > Card Status – this means the Merchant User can only view details about a Card.
